Prerequisites for Soldering Thru-Hole Components
Before diving into the soldering process, it is essential to have the right tools and materials. Here’s a list of what you’ll need:
- Soldering iron
- Solder (lead-based or lead-free)
- Soldering iron stand
- Sponge or brass wool for cleaning the soldering iron tip
- Flux (optional)
- Needle-nose pliers
- Wire cutters
- Safety glasses
- Ventilated workspace or fume extractor
Choosing the Right Soldering Iron
A soldering iron is the most crucial tool for soldering thru-hole components. When selecting a soldering iron, consider the following factors:
- Wattage: A soldering iron with a wattage between 20-60W is suitable for most thru-hole soldering tasks.
- Temperature control: Adjustable temperature control allows you to set the optimal temperature for the solder and component you are working with.
- Tip size and shape: Choose a tip that matches the size of the component leads and the soldering pads on the PCB.
Solder Types and Characteristics
Solder is an alloy of tin and lead (Sn/Pb) or tin, silver, and copper (Sn/Ag/Cu) for lead-free solders. The most common types of solder for thru-hole soldering are:
| Solder Type | Composition | Melting Point | Characteristics |
|---|---|---|---|
| 60/40 | 60% Sn, 40% Pb | 188°C (370°F) | Eutectic, easy to work with, widely used |
| 63/37 | 63% Sn, 37% Pb | 183°C (361°F) | Eutectic, slightly lower melting point than 60/40 |
| SAC305 | 96.5% Sn, 3% Ag, 0.5% Cu | 217-220°C (423-428°F) | Lead-free, higher melting point, requires more heat |
Eutectic solders have a single melting point, meaning they transition directly from solid to liquid state without a pasty stage, making them easier to work with.
Preparing the Soldering Iron and Workspace
- Set up your soldering iron in a well-ventilated area, ideally with a fume extractor to minimize exposure to solder fumes.
- Adjust the soldering iron temperature according to the solder and component specifications. A general starting point is around 350°C (662°F) for lead-based solder and 375°C (707°F) for lead-free solder.
- Clean the soldering iron tip by wiping it on a damp sponge or brass wool to remove any oxidation or residue.
- Tin the soldering iron tip by applying a small amount of solder to the tip and spreading it evenly. This helps improve heat transfer and prevents oxidation.

Preparing the Component and PCB
- Ensure the PCB is clean and free from dirt, grease, or oxidation. If necessary, clean the PCB with isopropyl alcohol and a lint-free cloth.
- Identify the correct orientation and placement of the thru-hole component based on the PCB layout and component markings.
- If the component leads are too long, trim them to the appropriate length using wire cutters. Leave enough lead length to extend slightly beyond the solder pad on the opposite side of the PCB.
- Bend the component leads at a 90-degree angle to fit through the designated holes on the PCB. Ensure the component body sits flush against the PCB surface.

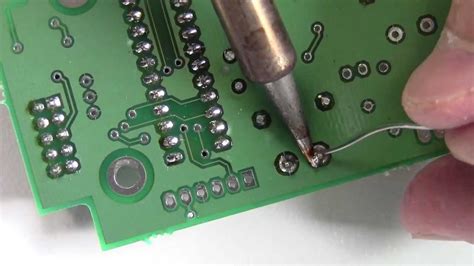
Soldering the Thru-Hole Component
- Insert the component leads through the corresponding holes on the PCB.
- Flip the PCB over and hold the component in place with your finger or needle-nose pliers to prevent it from falling out.
- Place the soldering iron tip on the solder pad and the component lead simultaneously. Hold it in place for 1-2 seconds to heat up the joint.
- Apply solder to the joint, allowing it to melt and flow around the lead and pad. Use just enough solder to create a concave fillet that fully envelops the lead and pad.
- Remove the solder and then the soldering iron tip while keeping the joint steady. Allow the solder to cool and solidify for a few seconds.
- Repeat the process for the remaining leads of the component.
Tips for Successful Soldering
- Keep the soldering iron tip clean and tinned throughout the soldering process.
- Apply heat to the joint for the appropriate duration. Insufficient heat may result in a cold joint, while excessive heat can damage the component or PCB.
- Avoid breathing in solder fumes by working in a well-ventilated area or using a fume extractor.
- If you make a mistake, use desoldering braid or a desoldering pump to remove the solder and start again.

Inspecting the Soldered Joint
After soldering, inspect the joint to ensure it is correctly formed and free from defects. A good solder joint should have the following characteristics:
- Concave fillet: The solder should form a concave fillet around the component lead and solder pad.
- Shiny surface: A properly soldered joint will have a shiny, smooth surface. A dull or grainy appearance may indicate a cold joint or contamination.
- No excess solder: Excessive solder can create short circuits or bridge adjacent pads. Remove any excess solder with desoldering braid or a desoldering pump.
- No gaps or voids: The solder should completely fill the joint, with no visible gaps or voids between the lead, pad, and solder.
If you notice any defects in the soldered joint, reheat the joint and apply additional solder or remove excess solder as needed.
Cleaning and Finishing
- Once you have completed soldering all the components, remove any flux residue from the PCB using isopropyl alcohol and a lint-free cloth.
- Visually inspect the PCB for any missed or defective solder joints, and make necessary repairs.
- If desired, apply a conformal coating or PCB lacquer to protect the soldered joints from moisture, dust, and corrosion.
Frequently Asked Questions (FAQ)
-
What is the difference between lead-based and lead-free solder?
Lead-based solder contains a mixture of tin and lead, typically in a 60/40 or 63/37 ratio. Lead-free solder, on the other hand, is made from a combination of tin, silver, and copper (SAC alloys). Lead-free solder has a higher melting point and requires slightly more heat to work with compared to lead-based solder. The use of lead-free solder is becoming more common due to environmental and health concerns associated with lead. -
Do I need to use flux when soldering thru-hole components?
Flux is not always necessary when soldering thru-hole components, as most solder wire comes with a rosin core that contains flux. However, using additional flux can help improve the solder flow and create a stronger, more reliable joint. Flux removes oxidation from the surfaces being soldered and prevents reoxidation during the soldering process. -
What should I do if I accidentally create a solder bridge between two pads?
A solder bridge occurs when excess solder accidentally connects two or more adjacent pads or leads. To remove a solder bridge, use desoldering braid or a desoldering pump to remove the excess solder. Place the desoldering braid on the solder bridge and apply heat with the soldering iron. The braid will absorb the molten solder, removing the bridge. Alternatively, use a desoldering pump to suction the molten solder away from the joint. -
Can I reuse a desoldered component?
In most cases, you can reuse a desoldered component as long as it has not been damaged during the desoldering process. However, be aware that the component leads may be shorter after desoldering, and the component may have been subjected to thermal stress. Inspect the component carefully for any signs of damage before reusing it. -
How can I prevent damaging sensitive components while soldering?
Some components, such as ICs and transistors, are sensitive to heat and can be damaged by prolonged exposure to high temperatures during soldering. To prevent damage, follow these tips: - Use a heat sink, such as needle-nose pliers, to grip the component lead between the component body and the solder joint. This helps dissipate heat away from the component.
- Work quickly and efficiently to minimize the duration of heat exposure.
- Use the lowest soldering iron temperature that still allows for proper solder flow.
- If possible, use a socket or a DIP (dual in-line package) adapter to avoid directly soldering sensitive components to the PCB.
Conclusion
Soldering thru-hole components is a fundamental skill for anyone working with electronics. By following the general steps and best practices outlined in this article, you can create strong, reliable solder joints and ensure the proper function of your electronic devices. Remember to prioritize safety, use the appropriate tools and materials, and practice regularly to refine your soldering technique. With patience and persistence, you’ll soon be able to confidently tackle any thru-hole soldering project that comes your way.


Leave a Reply