Introduction
Electronic development boards, also known as breakout boards or prototyping boards, have become an essential tool for engineers, hobbyists, and students interested in electronics and embedded system design. These boards provide a convenient way to prototype circuits and test out new ideas without having to design a custom printed circuit board (PCB). They come pre-assembled with various integrated circuits, interfaces, and connectors that can be easily interfaced with through solderless breadboards or headers. The wide availability and decreasing costs of these development boards have democratized access to advanced electronic design and enabled faster iteration.
In this article, we will provide an overview of some of the most popular electronic development boards on the market and how they aid in education, prototyping, and product development.
Popular Electronic Development Boards
Some of the most well-known and widely-used electronic development boards include:
Arduino
Arduino boards are based on simple microcontroller boards with GPIO pins that can be programmed using the Arduino IDE. Some popular Arduino boards include:
- Arduino Uno – based on the ATmega328P MCU with 14 digital I/O pins.
- Arduino Mega – based on the ATmega2560 MCU with 54 digital I/O pins.
- Arduino Nano – compact board based on ATmega328P.
Arduinos are great for simple prototyping and education. There is a huge community built around Arduino with lots of open-source code and tutorials available.
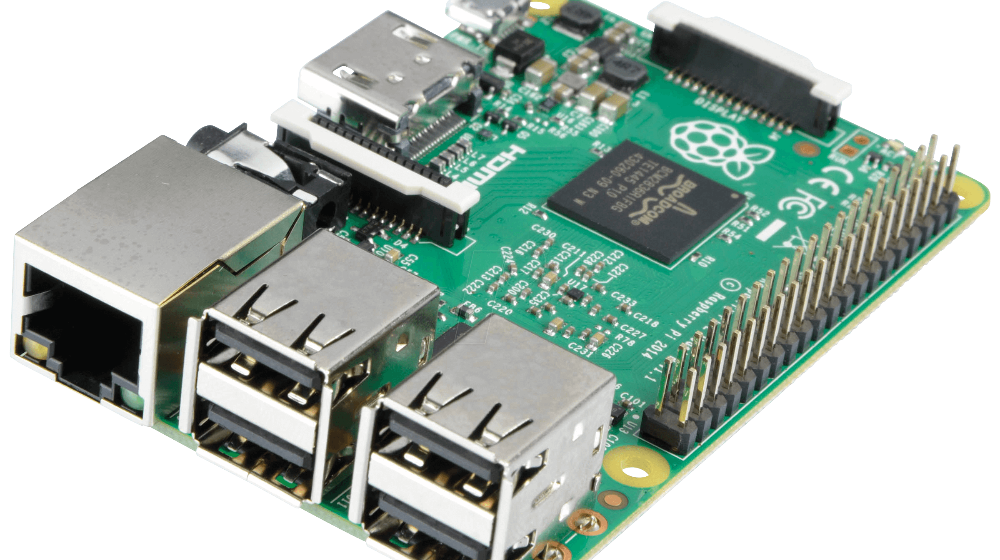
Raspberry Pi
The Raspberry Pi is a series of small single-board computers that run Linux. Some popular models include:
- Raspberry Pi 4 Model B – with a 1.5GHz quad-core ARM processor, up to 4GB RAM.
- Raspberry Pi Pico – a microcontroller board with dual-core ARM processor.
- Raspberry Pi Zero – compact and affordable model.
Raspberry Pis are essentially small Linux computers with GPIO pins that allow them to interface with electronic circuits. They are very versatile for more advanced applications like home automation, robotics, IoT devices, and more.
Espressif ESP32
The ESP32 is a popular low-cost microcontroller with built-in WiFi and BLE capabilities produced by Espressif Systems. It features a dual-core 32-bit CPU and over 30 GPIO pins. Some development boards containing the ESP32 MCU include:
- ESP32-DevKitC – affordable development board with ESP32-WROOM-32 module.
- Adafruit HUZZAH32 – compact board with ESP32 and connectors for LiPo battery.
- SparkFun ESP32 Thing – board with ESP32-WROOM-32, LiPo charging, and STEMMA QT connectors.
The integrated wireless capabilities allow the ESP32 to easily connect to WiFi networks and make IoT prototypes.
STM32
STM32 microcontrollers by STMicroelectronics are ARM Cortex-M based 32-bit MCUs that come in various models with different capabilities. Some common STM32 dev boards are:
- STM32F4 Discovery kit – for STM32F407VGT6 MCU.
- STM32 Nucleo-64 – boards with 64-pin STM32 MCUs and Arduino-compatible connectors.
- STM32F7 Discovery kit – for STM32F746NG MCU.
The STM32 MCUs provide great performance and peripheral support for advanced applications in industrial, medical, and consumer applications.
BeagleBoard
The BeagleBoard.org foundation provides open-source development boards based on Texas Instruments System-on-Chips (SoCs). Some of their boards include:
- BeagleBone Black – low-cost board with 1GHz ARM Cortex-A8 processor and 2GB eMMC flash and DDR3 RAM.
- BeagleBoard-X15 – more powerful board with 1.5GHz dual-core ARM Cortex-A15.
- PocketBeagle – tiny USB-key sized development board.
The BeagleBoard boards are capable of running full operating systems like Linux and Android. They are commonly used for more advanced projects.
Capabilities & Features
These development boards offer various capabilities through their onboard peripherals and interfaces:
- Microcontroller/Processor – contains the MCU or main processor like ARM Cortext-M, ARM Cortex-A, AVR, PIC, Intel, etc. that runs the board.
- GPIO Pins – general purpose input/output pins that can connect to LEDs, switches, sensors, motors, communication buses, and other electronic circuits and components.
- Wireless Communication – onboard WiFi, Bluetooth, LoRa, Sigfox, NB-IoT, and other wireless capabilities.
- Wired Communication Buses – buses like UART, SPI, and I2C for interfacing with peripherals. As well as USB, Ethernet, HDMI, LCD interfacing.
- Debugging Support – debugging with JTAG and SWD protocols. Some have onboard debugging chips.
- Storage Support – SD card slots, eMMC flash chips for storage, as well as RAM chips.
- Real-time Clocks – for keeping time.
- Motor Controllers – motor driver chips like the L298 for controlling DC motors.
- Sensor Interfacing – ADC, comparators, amplifiers for reading from analog sensors.
- Audio/Video Support – DACs, ADCs, and codecs for audio and video. As well as VGA, LCD displays, camera modules.
- Battery Charging & Power Management – LiPo charging and voltage regulation circuitry.
This wide range of built-in capabilities allow these boards to interface with all kinds of electronic devices for rapid prototyping. The table below shows some of the features of popular boards:
| Board | Microcontroller | Wireless | Wired Comms | Debugging | GPIO Pins |
|---|---|---|---|---|---|
| Arduino Uno | ATmega328P | – | UART | – | 14 |
| ESP32-DevKitC | ESP32 | WiFi, BLE | UART, SPI | JTAG | 34 |
| Raspberry Pi 4 | ARM Cortex-A72 | WiFi, BLE | USB, Ethernet, HDMI | – | 40 |
| STM32 Nucleo-64 | ARM Cortex-M | – | I2C, SPI | SWD | 64 |
| BeagleBone Black | ARM Cortex-A8 | – | USB, Ethernet, HDMI | – | 65 |
Use Cases
Electronic development boards are useful across many different domains:
Prototyping
Development boards allow quick prototyping by eliminating the need for tedious PCB design just to test an idea. Prototypes can be easily modified using solderless breadboards and jumper wires.
Education
These boards serve as great educational tools to help teach electronics and programming concepts in a hands-on manner. From basic Arduino projects in schools to advanced robotics or IoT projects in colleges.
Research
Researchers can leverage the capabilities of dev boards for practical implementation of electronics and software research projects in wireless communications, control systems, robotics, and more.
Product Development
Companies use dev boards to build prototypes and proof-of-concepts during product development before designing their custom PCB. This helps validate the product idea.
Art and Hobby Projects
Enthusiasts use development boards in unique art and hobby projects, like music synthesizers, LED installations, home automation, and mechanical robots.
Industrial Applications
Dev boards enable monitoring and controlling of industrial systems by interfacing with sensors, motors, valves, relays, and more. For data collection and automation.
In summary, development boards accelerate innovation by enabling faster and cheaper prototyping across wide applications.
Getting Started with Electronic Development Boards
Here are some tips for someone new to working with electronic development boards:
- Pick a popular beginner-friendly board like Arduino, Raspberry Pi or ESP32 based on your application needs and experience level.
- Obtain the necessary electronic components like LEDs, resistors, sensors, motors, etc. and connect them to the dev board as per circuit diagrams.
- Install any required software like the Arduino IDE, Python, embedded C etc. depending on the board. Work through sample programs and sketches provided.
- Learn programming concepts like GPIO control, PWM, ADC, UART, I2C communication etc. to interact with electronic devices.
- Use online tutorials, example projects, and development board specific forums/communities to learn and get help.
- Start with simpler projects before attempting more complex applications. Good beginner projects include blinking LEDs, DC motor control, temperature sensing etc.
- Use breadboards and jumper wires to prototype before soldering a permanent circuit. Always double check connections before powering on a circuit.
- Invest in a digital multimeter, basic electronic components, wire cutters/strippers, soldering iron, oscilloscope etc. for troubleshooting and testing circuits.
- Take appropriate safety precautions against electric shocks and short circuits. Use protective enclosures for exposed circuits.
- Have fun experimenting and expanding your capabilities. Electronic development boards enable rapid learning through hands-on implementation.
Conclusion
Electronic development boards have transformed prototyping and enabled faster innovation across industries and skill levels. Easy availability and reducing costs have also made advanced electronics experimentation accessible to wider audience of students, hobbyists, and engineers. Platforms like Arduino, Raspberry Pi, and ESP32 will continue fueling the growth of the maker community while also serving professional engineering needs. With the increasing popularity of STEM education, development boards can serve as powerful tools for hands-on learning of core concepts that will empower the next generation of innovators and problem solvers.
FAQs about Electronic Development Boards
Q1. What are some key differences between microcontroller boards like Arduino and single board computers like Raspberry Pi?
The main differences are:
- Microcontrollers like Arduino are designed for real-time control and operation of electronic circuits. SBCs like Raspberry Pi are mini-computers running an OS optimized for general purpose computing and connectivity.
- Microcontrollers have very fast GPIO toggle speeds (microseconds) since they are designed to control real-time peripherals. SBC GPIO speeds are slower by comparison.
- Microcontrollers have deterministic execution suitable for real-time applications while SBCs have more complex OS where processes can be interrupted.
- Microcontrollers have lower power consumption while SBCs like RPi consume significantly more power given their CPU and OS overhead.
- Microcontrollers offer more direct hardware control while SBC OS abstracts hardware for easier software programming.
- Microcontroller programming is done via IDEs using languages like embedded C or Arduino. SBCs can run higher level languages.
Q2. How do I determine which electronic development board is right for my application?
Consider the following factors:
- Processing power needed – some applications require more powerful processors like ARM Cortex-A in SBCs vs. simpler microcontrollers.
- Real-time needs – determinism and timing guarantees are needed for applications like motor control. Microcontrollers are better suited.
- Peripherals required – communication buses, wireless options, sensors, interfaces etc. Pick a board that supports required peripherals.
- Development environment – some are easier to program than others. Evaluate code development complexity.
- Community and support – larger communities make development easier. Check forums and libraries available.
- Power and size constraints – battery-powered and space-constrained applications require managing power and size.
- Budget – some boards are more affordable than others. Balance capabilities and costs.
Q3. Do I need to learn electronics to work with development boards?
Some basic electronics knowledge will be very helpful when working with development boards, like:
- Basics of voltage, current, resistance, power. Helps to understand circuits and troubleshoot issues.
- Using basic equipment like digital multimeters, oscilloscopes, power supplies. Needed for testing and measurements.
- Reading electronic schematics. Important for understanding how dev board circuits work.
- Identifying common electronic components like resistors, capacitors, diodes, transistors etc. Need to use them in projects.
- Understanding communication buses like UART, SPI, I2C. Used to connect with sensors and other boards.
- Knowledge of circuits like voltage regulators, amplifiers, filters. Dev boards use them internally and externally.
- Following safety practices to avoid electric shock, short circuits, ESD etc. Prevents damage to boards and components.
However, you can get started without electronics experience since development boards simplify circuit design. Many online resources help bridge the gap. But basic electronics knowledge will definitely help troubleshoot issues faster.
Q4. How can I expand the capabilities of a development board beyond its onboard peripherals?
There are a few options to extend a development board:
- Use plug-in modules like sensors, motor drivers, displays that provide additional functionality through board headers.
- Use an add-on expansion board or shield that stacks on top of the dev board to give added features.
- Connect external circuit components like sensors, power regulators, relay boards via jumper wires.
- Interface with another microcontroller or development board using communication buses like I2C, SPI to distribute processing.
- For wireless communication, use external WiFi/Bluetooth modules attached to UART/SPI pins.
- Use PCBs like prototyping hats to solder components like sensors, antennas and attach to headers.
- For human interfaces, add components like buttons, switches, rotary encoders, LCD displays using jumper wires.
- Build custom circuit boards like daughterboards that interface with the main board through connectors.
Q5. What are some ways I can power a development board?
Development boards can be powered from:
- USB connection – simple but limited in current rating.
- Power adapter/wall wart – barrel jack connector. Offers higher current.
- Batteries like AA or 18650 cells – commonly used option. Requires voltage regulation.
- LiPo batteries with protection circuitry – lightweight and rechargeable.
- Solar panels – harvest renewable energy. Require charging circuitry.
- External bench power supplies – adjustable voltage and current rating. Good for testing.
- POE (Power over Ethernet) – inject power into Ethernet cables.
- Direct DC power source – optimal for fixed installations, not portable.
Choose an appropriate power source based on the board’s input voltage range and max current consumption. Ensure the source can deliver enough sustained current for the application.


Leave a Reply